Python 소스코드를 Visual C++ 로 빌드하는 방법
파이썬은 다음의 경로에서 소스 코드까지 다운로드 받을 수 있습니다.
파이썬 - 다운로드
; http://www.python.org/download/releases/3.3.0/
이 글은 3.3.0 을 다운로드 받아서 컴파일합니다.
Gzipped source tar ball (3.3.0) (sig), ~ 16 MB
; http://www.python.org/ftp/python/3.3.0/Python-3.3.0.tgz
또한 32비트와 64비트로 빌드할 수 있는데, 여기서는 64비트로 빌드하기 위한 예를 들 것입니다. (32비트도 비슷하게 빌드할 수 있습니다.)
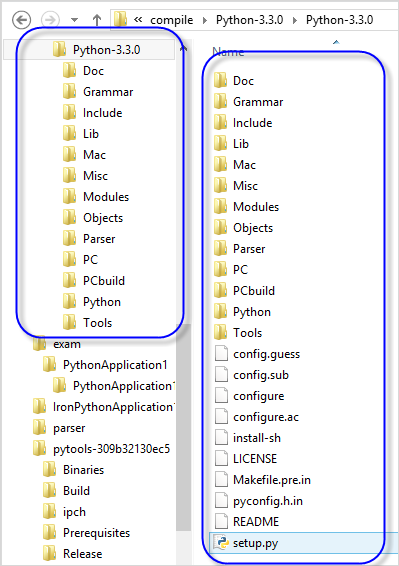
다운로드 받고 압축을 풀면 다음과 같은 구조로 디렉토리가 생성됩니다.

보시는 것처럼, 루트에 있는 configure 같은 파일들은 Visual C++과는 무관한 것들입니다. 다행히 Visual C++로 빌드할 수 있는 환경도 포함되어 있는데요. \PCbuild 폴더를 보면 낯익은 vcxproj 확장자를 볼 수 있습니다.
그 폴더의 readme.txt를 보면 좀더 상세한 빌드 방법을 볼 수 있습니다.
readme에 의하면 32비트로 빌드하려면 Visual C++ 2008 Express가 필요한 반면, 64비트로 빌드하려면 Visual C++ 2008 Standard 가 설치되어야 한다고 되어 있습니다. 지난 시절에는 그랬지만, Visual Studio 2012 Express 버전부터는 기본적으로 64비트 C++ 컴파일러가 포함되어 있어서 그냥 Express 버전으로도 빌드할 수 있습니다. (^^ 원칙이 그렇다는 것 뿐이고 여기서는 Visual Studio 2010 Ultimate으로 빌드할 것입니다.)
빌드를 위해서 사전에 준비해야 할 외부 툴들이 있습니다.
우선 svn.exe파일이 명령행에서 접근가능해야 합니다. 이 때문에 저는 tortoisesvn을 설치했습니다.
Windows tortoisesvn
; http://tortoisesvn.tigris.org/

Download
; http://tortoisesvn.net/downloads.html
제 경우에는 "TortoiseSVN-1.7.11.23600-x64-svn-1.7.8.msi" 를 다운로드 받았습니다.
설치 과정에서 "command line client tools" 항목이 기본적으로 "설치 안함"으로 되어 있는데요. 이걸 선택해 주어야 svn.exe 파일이 함께 생성됩니다.
그 다음 ActivePerl 을 설치해 줍니다.
ActiveState
; http://www.activestate.com/activeperl/downloads
제 경우에는 "TortoiseSVN-1.7.11.23600-x64-svn-1.7.8.msi" 파일을 다운로드 받았습니다.
SVN과 Perl 모두 64비트로 다운로드 받았습니다.
마지막으로 nasm 을 다운로드 받아 압축을 풀고, PATH에 걸어줍니다.
NASM 2.10.07
; http://www.nasm.us/pub/nasm/releasebuilds/2.10.07/nasm-2.10.07.zip
nasm.exe로 되어 있는데, nasmw.exe로 하나 더 복사해 줍니다.
아래는 제가 설치한 3가지 도구의 경로입니다.
C:\Perl64
C:\Program Files\TortoiseSVN
C:\nasm-2.10.07
설치 후, 반드시 x64 Command 창에서 svn.exe 와 perl.exe, nasmw.exe 에 대해 실행 유무를 확인합니다.
빌드하기 전, 사전 변경 작업을 해줘야 합니다.
우선 ".\Python-3.3.0\PCbuild\pyproject.props" 파일의 인코딩을 ANSI로 바꿔서 저장해 주어야 합니다. 그렇지 않으면 빌드 도중에 다음과 같은 식의 오류가 발생합니다.
error MSB3073: The command "cd "c:\Python-3.3.0\PCbuild\"
"c:\Python-3.3.0\PCbuild\python_d.exe" build_ssl.py Release Win32 -a" exited with code 1.
C:\Program Files\MSBuild\Microsoft.Cpp\v4.0\Microsoft.MakeFile.Targets    38  6   ssl
위의 명령어를 직접 명령행 창에서 실행하면 좀더 상세한 오류 메시지를 볼 수 있습니다.
c:\Python-3.3.0\PCbuild>"c:\Python-3.3.0\PCbuild\python_d.exe" build_ssl.py Release Win32 -a
Found a working perl at 'D:\os\cygwin\bin\perl.exe'
Traceback (most recent call last):
  File "build_ssl.py", line 253, in <module>
    main()
  File "build_ssl.py", line 181, in main
    ssl_dir = get_ssl_dir()
  File "build_ssl.py", line 70, in get_ssl_dir
    m = re.search('openssl-([^<]+)<', f.read())
UnicodeDecodeError: 'cp949' codec can't decode byte 0xbf in position 2: illegal multibyte sequence
[54599 refs]
build_ssl.py 파일을 열어서 오류가 발생한 메소드를 보면,
def get_ssl_dir():
    propfile = (os.path.join(os.path.dirname(__file__), 'pyproject.props'))

    with open(propfile) as f:
        m = re.search('openssl-([^<]+)<', f.read())
        return "..\..\openssl-"+m.group(1)
오류는 f.read() 에서 발생한 것입니다. f의 대상 파일은 pyproject.props 파일인데, 이것을 Visual Studio에서 열어 Encoding 설정을 확인하면 "Unicode (UTF-8 with signature) - Codepage 65001"이라고 나옵니다. 아마도 유니코드용 BOM signature 를 해석하는 부분에서 오류가 발생한 것 같은데요. 그래서 그 파일을 "US-ASCII - Codepage 20127"로 변경해서 저장을 했습니다.
이제, Visual Studio 의 x64 빌드용 Command Prompt 를 실행하고, \Python-3.3.0 폴더로 이동해 \Tools\buildbot\external-amd64.bat 을 실행합니다.
cd c:\...[생략]...\Python-3.3.0
c:\...[생략]...\Python-3.3.0>Tools\buildbot\external-amd64.bat
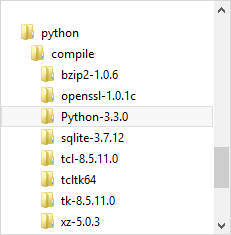
실행하면 다음과 같이 Python-3.3.0 소스 코드와 동일한 레벨로 폴더들이 추가됩니다.

그 다음 tk-8.5.11.0\win 폴더로 이동해서 nmake 를 한번 더 실행해 줍니다.
cd d:\...[생략]...\tcl-8.5.11.0\win
nmake -f makefile.vc COMPILERFLAGS=-DWINVER=0x0500 MACHINE=AMD64 INSTALLDIR=..\..\tcltk64 clean all install
위의 과정을 실행하지 않으면 나중에 pcbuild.sln 으로 빌드할 때 다음과 같은 오류가 발생할 수 있습니다.
1>------ Build started: Project: _tkinter, Configuration: Release x64 ------
1>LINK : fatal error LNK1181: cannot open input file '..\..\tcltk64\lib\tcl85.lib'
========== Build: 0 succeeded, 1 failed, 4 up-to-date, 0 skipped ==========
nmake 실행 후 .\tcltk64\lib\tcl85.lib 파일이 생성되었는지 확인합니다.
그 다음 .\openssl-1.0.1c\crypto\x86_64cpuid.pl 파일을 열어서 다음과 같은 라인을 추가해 주어야 합니다.
#!/usr/bin/env perl

$flavour = shift;
$output  = shift;
if ($flavour =~ /\./) { $output = $flavour; undef $flavour; }

$win64=0; $win64=1 if ($flavour =~ /[nm]asm|mingw64/ || $output =~ /\.asm$/);

$0 =~ m/(.*[\/\\])[^\/\\]+$/; $dir=$1;

( $xlate="${dir}x86_64-xlate.pl" and -f $xlate ) or
( $xlate="${dir}perlasm/x86_64-xlate.pl" and -f $xlate) or
die "can't locate x86_64-xlate.pl";

$xlate =~ s/\\/\//g;

open STDOUT,"| $^X $xlate $flavour $output";

# ...[생략]...
위와 같이 해주지 않으면 나중에 빌드에서 다음과 같은 식의 오류가 발생합니다.
1>------ Build started: Project: ssl, Configuration: Debug x64 ------
1>  Found a working perl at 'C:\Perl64\bin\perl.exe'
1>  Executing ssl makefiles: nmake /nologo -f "ms\nt64.mak"
1>  Building OpenSSL
1>   set ASM=nasm -f win64 -DNEAR -Ox -g
1>    crypto\x86_64cpuid.pl tmp64\x86_64cpuid.asm
1>  Can't open perl script "d:pythoncompileopenssl-1.0.1ccryptoperlasm/x86_64-xlate.pl": No such file or directory
1>   nasm -f win64 -DNEAR -Ox -g -o tmp64\x86_64cpuid.obj tmp64\x86_64cpuid.asm
1>  nasm: fatal: unable to open input file `tmp64\x86_64cpuid.asm'
1>NMAKE : fatal error U1077: 'E:\nasm-2.10.07\nasm.EXE' : return code '0x1'
1>  Stop.
1>  Executing ms\nt64.mak failed
1>  2
1>  [54550 refs]
1>C:\Program Files\MSBuild\Microsoft.Cpp\v4.0\Microsoft.MakeFile.Targets(38,5): error MSB3073: The command "cd "D:\...[생략]...\Python-3.3.0\PCbuild\"
1>C:\Program Files\MSBuild\Microsoft.Cpp\v4.0\Microsoft.MakeFile.Targets(38,5): error MSB3073: "D:\...[생략]...\Python-3.3.0\PCbuild\amd64\python_d.exe" build_ssl.py Release x64 -a
1>C:\Program Files (x86)\MSBuild\Microsoft.Cpp\v4.0\Microsoft.MakeFile.Targets(38,5): error MSB3073: " exited with code 2.
========== Build: 0 succeeded, 1 failed, 6 up-to-date, 0 skipped ==========
보시는 것처럼 경로를 "d:pythoncompileopenssl-1.0.1ccryptoperlasm/x86_64-xlate.pl" 로 해석하는데요. $xlate 변수 값을 보면 "d:\python\compile\openssl-1.0.1c\crypto\perlasm/x86_64-xlate.pl" 로 되어 있기 때문입니다. 여기서 '\' 문자를 '/'로 바꾸고 open을 실행해 주면 정상적으로 처리됩니다.
그런데, 사실 이렇게 해도 여전히 tmp64\x86_64cpuid.asm 파일은 생성되지 않았습니다. 휴~~~ 힘들군요. 더 이상 원인은 모르겠습니다. ^^; (혹시 이 부분에 대해 아시는 분 있으시면 덧글 부탁드립니다.)
대신, 다른 방법을 찾았는데요. 가만 보니 \openssl-1.0.1c\asm64 폴더의 내용이 \openssl-1.0.1c\tmp64 폴더의 내용에서 원하는 것들이 모두 들어 있는 것 같아서 복사를 해주었습니다. (즉, asm64의 모든 파일을 tmp64로 그대로 복사해줍니다.)
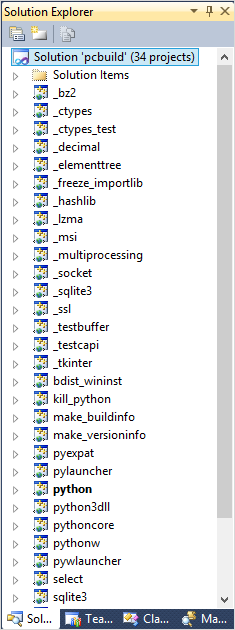
준비 작업은 그걸로 모두 끝입니다. 이제 \PCBuild\pcbuild.sln 파일을 Visual Studio 에서 로드합니다.

그런 후 Build 를 Win32 에서 x64 으로 바꾸고 빌드를 시작합니다. 그럼... 아주 깨끗하게 빌드가 완료됩니다. ^^
사실, 위의 선행 단계를 하지 않고 그냥 PCBuild.sln만 빌드하다가 오류가 발생해도 상관없습니다. python.exe까지는 빌드가 된 상태이기 때문에 왠만한 것은 테스트 해 볼 수 있는데요. 그래도 ^^ 왠지 모든 것이 빌드 안되면 시원하지 않기 때문에 마무리를 지어보았습니다.
일단, 한번 빌드가 된 후에는 ssl 프로젝트를 unload 해놓고 작업하시는 것이 좋습니다. (안 그러면 매번 Build Event로 걸린 작업 때문에 빌드 작업에 시간이 걸립니다.)
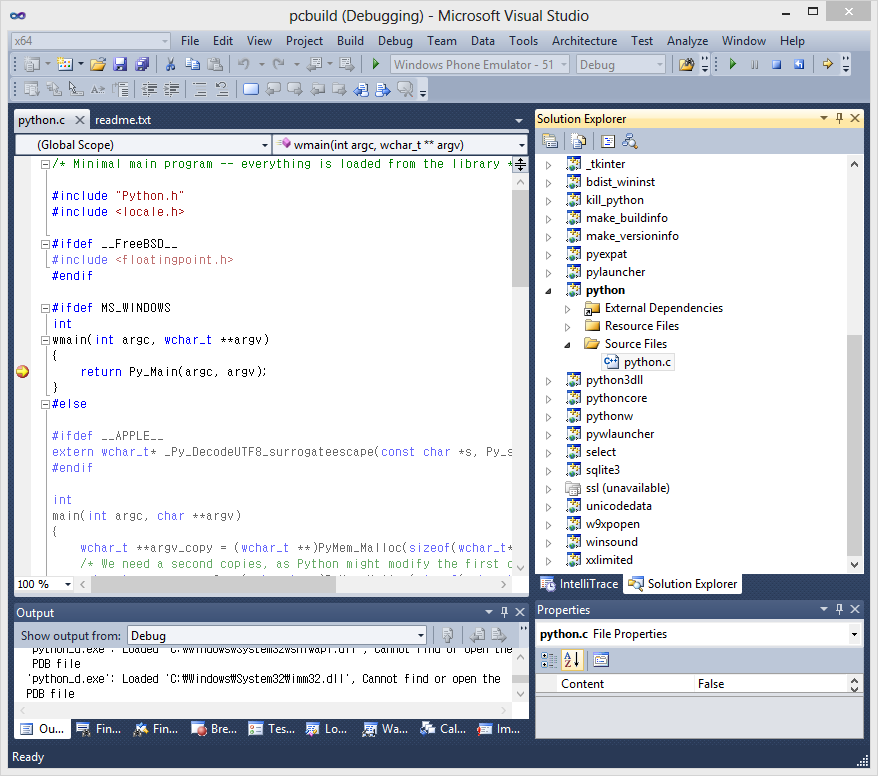
자... 아래는 이렇게 파이썬을 빌드해서 F5 디버깅을 걸어본 인증샷입니다. ^^

역시 ^^ F5 디버깅이 되어야!!!
다음은 제가 겪었던 빌드 오류에 대한 내용을 정리해 보았습니다.
처음에 PCBuild.sln 파일을 무작정 Visual Studio에 로드하고 빌드 명령을 내렸었는데요. 그랬더니 많은 오류가 발생했습니다. 그 중 가장 첫번째 오류가 sqlite3.c 를 찾을 수 없다는 것입니다.
1>------ Build started: Project: sqlite3, Configuration: Debug Win32 ------
1>  sqlite3.c
1>c1 : fatal error C1083: Cannot open source file: '..\..\sqlite-3.7.12\sqlite3.c': No such file or directory
실제로 pcbuild.sln 에 포함된 sqlite3 프로젝트에 가서 sqlite3.c 파일을 열려고 하면 ".\Python-3.3.0\sqlite-3.7.12\sqlite3.c" 파일이 없다고 나옵니다.
이 파일은 다음의 경로에서 다운로드 받아야 합니다.
SQLite Download Page
; http://www.sqlite.org/download.html
오늘 날짜 기준오르 3.7.15.2가 릴리즈되어 있는데요. 상관없습니다. ".\Python-3.3.0\sqlite-3.7.12\" 폴더를 만들어 주고, 그 아래에 sqlite3.c, sqlite3.h, sqlite3ext.h 파일을 복사해 놓으면 됩니다.
문제는 ^^ 여기서 끝이 아니라는 것입니다. 파이썬 소스 코드는 그 외에도 많은 외부 의존성을 가지고 있는데요. 이런 식으로 일일이 수작업으로 맞춰주는 것도 가능하겠지만, 파이썬 소스 코드에 이미 이런 것들을 한꺼번에 내려받도록 도와주는 배치 파일을 제공하고 있습니다. 그것이 바로 위에서 실행했던 \Tools\buildbot\external-amd64.bat 입니다.
ssl 빌드할 때 다음과 같은 오류가 발생한다면, Perl이 설치되어 있지 않은 탓입니다. 그냥 ActivePerl 을 설치해 주면 해결됩니다. (물론, %PATH%에 잡혔는지 확인해 주시고.)
1>------ Build started: Project: ssl, Configuration: Debug Win32 ------
1>  Can not find a suitable PERL:
1>   NO perl interpreters were found on this machine at all!
1>   Please install ActivePerl and ensure it appears on your path
1>  No Perl installation was found. Existing Makefiles are used.
1>  Executing ssl makefiles: nmake /nologo -f "ms\nt.mak"
1>  Building OpenSSL
1>   link /nologo /subsystem:console /opt:ref /debug /out:out32\md4test.exe @C:\...[생략]...\Local\Temp\nmB40E.tmp
1>libeay32.lib(p12_decr.obj) : error LNK2001: unresolved external symbol _OPENSSL_cleanse
... [생략] ...
1>out32\md4test.exe : fatal error LNK1120: 23 unresolved externals
1>NMAKE : fatal error U1077: '"C:\Program Files\Microsoft Visual Studio 10.0\VC\bin\link.EXE"' : return code '0x460'
1>  Stop.
1>  Executing ms\nt.mak failed
1>  2
1>  [52058 refs]
1>C:\Program Files\MSBuild\Microsoft.Cpp\v4.0\Microsoft.MakeFile.Targets(38,5): error MSB3073: The command "cd "d:\...[생략]...\Python-3.3.0\PCbuild\"
1>C:\Program Files\MSBuild\Microsoft.Cpp\v4.0\Microsoft.MakeFile.Targets(38,5): error MSB3073: "d:\...[생략]...\Python-3.3.0\PCbuild\python_d.exe" build_ssl.py Release Win32 -a
1>C:\Program Files\MSBuild\Microsoft.Cpp\v4.0\Microsoft.MakeFile.Targets(38,5): error MSB3073: " exited with code 2.