http://wp.goodchois.kr/devtip/archives/369
http://blog.naver.com/PostView.nhn?blogId=dhrod0325&logNo=140165607558
삽질끝에 해냈다…
다 하고나니 별로 어려운것도 없는데 여기저기 설명이 복잡하게 되있어서 개 삽질했따 ㅡ.ㅡ;;
순서는 다음과 같다.
1. 구글 API콘솔 계정과 프로젝트 생성
2. 클라이언트 제작
3. 서버 제작
위 순서를 지켜 제작을 시작한다.
https://code.google.com/apis/console/ 에 가입한다.

요런 비스무리한 화면이 나온다.
Services로 이동한후Google Cloud Messaging for Android 를 찾고 on으로 바꾼다.

그 다음 API Access 로 이동한다.
Create new Server key를 누른다
그럼 창이 하나 나오는데 그냥 Create한다.
그러면
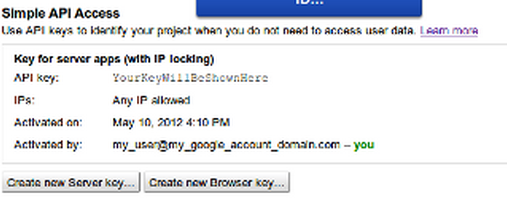
요딴 화면이 나온다.
API key는 서버쪽에서 메시지를 보낼때 사용된다.
요렇게 하면 1단계는 끝. 그럼 2단계로 이동한다.
안드로이드 프로젝트를 만든다.
AndroidManifest.xml 파일을 수정한다.
- 퍼미션 추가
<permission android:name=”com.example.gcmproject.permission.C2D_MESSAGE” android:protectionLevel=”signature” />
<uses-permission android:name=”com.example.gcmproject.permission.C2D_MESSAGE” />
<uses-permission android:name=”com.google.android.c2dm.permission.RECEIVE” />
<uses-permission android:name=”android.permission.INTERNET” />
<uses-permission android:name=”android.permission.GET_ACCOUNTS” />
<uses-permission android:name=”android.permission.WAKE_LOCK” />
- 리시버 추가
<application
android:icon=”@drawable/ic_launcher”
android:label=”@string/app_name”
android:theme=”@style/AppTheme” >
…
<receiver android:name=”com.google.android.gcm.GCMBroadcastReceiver” android:permission=”com.google.android.c2dm.permission.SEND” >
<intent-filter>
<action android:name=”com.google.android.c2dm.intent.RECEIVE” />
<action android:name=”com.google.android.c2dm.intent.REGISTRATION” />
<category android:name=”com.example.gcmproject” />
</intent-filter>
</receiver>
<service android:name=”.GCMIntentService” />
요렇게 하면 manifest설정은 끝 그럼 엑티비티를 수정한다.
참고로 패키지명은 보면서 자신에 맞는 패키지로 바꾸기 바란다.
그리고 gcm라이브러리를 설치해야한다.
sdk메니저를 킨후 extras에있는 gcm을 설치한다.
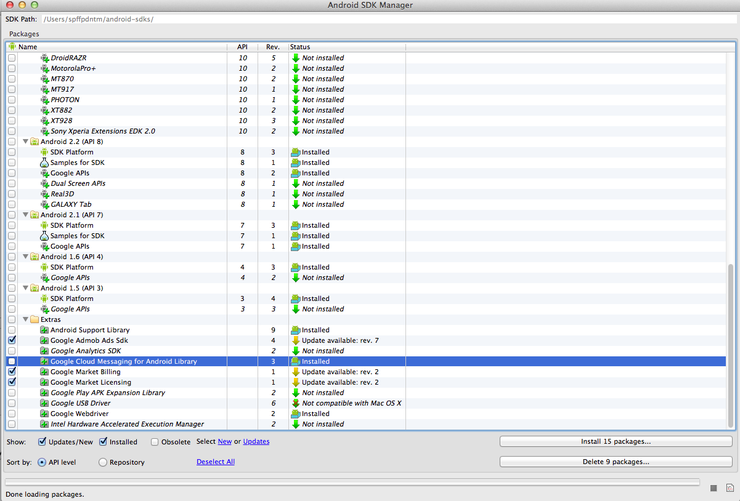
그리고 본인의 sdk폴더에 extras/google폴더에 들어가보면 gcm/gcm-client/dist/gcm.jar 파일이 있다. 이걸 그냥 프로젝트 libs폴더에 추가하면 된다.
그리고 액티비티를 수정한다.
public class MainActivity extends Activity {
@Override
public void onCreate(Bundle savedInstanceState) {
super.onCreate(savedInstanceState);
setContentView(R.layout.activity_main);
registerGcm();
}
@Override
public boolean onCreateOptionsMenu(Menu menu) {
getMenuInflater().inflate(R.menu.activity_main, menu);
return true;
}
public void registerGcm() {
GCMRegistrar.checkDevice(this);
GCMRegistrar.checkManifest(this);
final String regId = GCMRegistrar.getRegistrationId(this);
if (regId.equals(“”)) {
GCMRegistrar.register(this, ”프로젝트 아이디”);
} else {
Log.e(“reg_id”, regId);
}
}
}
여기서 프로젝트 아이디는 개발자 콘솔에 로그인하면 주소 뒤에 프로젝트 아이디가 붙는다.
https://code.google.com/apis/console/#project:24242424424:access
저기서 24242424424가 프로젝트 아이디다.
그리고 intentService클레스를 만든다.
public class GCMIntentService extends GCMBaseIntentService {
private static void generateNotification(Context context, String message) {
int icon = R.drawable.ic_action_search;
long when = System.currentTimeMillis();
NotificationManager notificationManager = (NotificationManager) context
.getSystemService(Context.NOTIFICATION_SERVICE);
Notification notification = new Notification(icon, message, when);
String title = context.getString(R.string.app_name);
Intent notificationIntent = new Intent(context, MainActivity.class);
notificationIntent.setFlags(Intent.FLAG_ACTIVITY_CLEAR_TOP
| Intent.FLAG_ACTIVITY_SINGLE_TOP);
PendingIntent intent = PendingIntent.getActivity(context, 0,
notificationIntent, 0);
notification.setLatestEventInfo(context, title, message, intent);
notification.flags |= Notification.FLAG_AUTO_CANCEL;
notificationManager.notify(0, notification);
}
@Override
protected void onError(Context arg0, String arg1) {
}
@Override
protected void onMessage(Context context, Intent intent) {
String msg = intent.getStringExtra(“msg”);
Log.e(“getmessage”, ”getmessage:” + msg);
generateNotification(context, ”push”);
}
@Override
protected void onRegistered(Context context, String reg_id) {
Log.e(“키를 등록합니다.(GCM INTENTSERVICE)”, reg_id);
}
@Override
protected void onUnregistered(Context arg0, String arg1) {
Log.e(“키를 제거합니다.(GCM INTENTSERVICE)”, ”제거되었습니다.”);
}
}
요렇게 하면 소스도 끝이다. 실행하게 되면 콘솔에 기기 registrationId가 뜬다
![]()
저기 APA91어쩌고 저쩌고가 기기 아이디다.
다음은 서버 제작인데 그냥 자바 프로젝트로 해도 상관이 없기때문에 자바 프로젝트를 만들겠따.
의존하는 라이브러리는 두개다.
1. gcm-server.jar
2. json-simple-1.1.1.jar
자바 소스도 간단하다.
import java.io.IOException;
import java.util.ArrayList;
import java.util.List;
import com.google.android.gcm.server.Message;
import com.google.android.gcm.server.MulticastResult;
import com.google.android.gcm.server.Result;
import com.google.android.gcm.server.Sender;
public class GCMServerSide {
public void sendMessage() throws IOException {
Sender sender = new Sender(“APIKEY“);
String regId = “기기 아이디“;
Message message = new Message.Builder().addData(“msg”, “push notify”).build();
List<String> list = new ArrayList<String>();
list.add(regId);
MulticastResult multiResult = sender.send(message, list, 5);
if (multiResult != null) {
List<Result> resultList = multiResult.getResults();
for (Result result : resultList) {
System.out.println(result.getMessageId());
}
}
}
public static void main(String[] args) throws Exception {
GCMServerSide s = new GCMServerSide();
s.sendMessage();
}
}

intentService를 구현한 부분에
@Override
protected void onMessage(Context context, Intent intent) {
String msg = intent.getStringExtra(“msg”); <– 여기서 접근이 가능하다.
Log.e(“getmessage”, ”getmessage:” + msg);
generateNotification(context, ”push”);
}
요렇게 하면 GCM도 끝~!
주의 해야 할 부분은
SENDER_ID -> API CONSOLE 뒷부분에 붙는 숫자.
API KEY -> 콘솔에서 확인할수 있는 키
요거를 들어갈 자리에 똑바로 넣는것이 가장 중요하다.
그리고 내 안드로이드 기기는 디자이어hd인데 버전이 2.2인데도 불구하고 푸쉬알림이 안온다 ㅡ.ㅡ;;
다른 기계에서 테스트 해보니 제대로 뜬다.
어쨌거나 주저리 주저리 적었는데 제대로 적었는지 모르겠다~!
'차근차근 > Android' 카테고리의 다른 글
| [안드로이드] 여러 이미지를 서버에 업로드하는 방법 (0) | 2014.08.21 |
|---|---|
| GCM 사용하기 2 (단말에 GCM 구현하기) (0) | 2014.07.30 |
| GCM 관련 참고사항입니다 (0) | 2014.07.29 |
| Google Cloud Messaging / GCM (0) | 2014.07.29 |
| [본문스크랩] apk 디컴파일부터 빌드, 서명, zip 정렬까지 한큐에 해결! 이보다 쉬운 설명은 없다고 장담한다. (0) | 2014.07.29 |